Quantcast
Channel: Ruby API - SketchUp Community
Viewing all 3017 articles
Browse latest View live

X-Z Plane Issues for Push-Pull

$
0
0

@medeek wrote:

When I’m creating window and door geometry within the new wall plugin I’ve noticed a small degree of unpredictability with regards to the push-pull direction for faces on the X-Z plane. Sometimes it goes one direction, sometimes another. This of course creates problems for me since it make my solids potentially extrude out the wrong direction. 9 out of 10 times I don’t see the issue but once in a while, BOOM, its there, I’m scratching my head.

For geometry that I am starting out on an X-Y Plane I do a quick check to see if Z equals zero. If it does I reverse the push pull direction, this works quite reliably. I am wondering though what could be the situation with the X-Z plane and if Y equals zero I need to reverse the direction. Perhaps the small rounding errors with floats is causing this unpredictable behavior.

Wondering if anyone else has had a similar issue.

Posts: 6

Participants: 2

Read full topic


Execute UI.messagebox when a tool is deactivated or on 'onReturn'

$
0
0

@Rojj wrote:

I have developed a tool that allows users to select a few surfaces and then perform some calculations on them.

When the user either deactivate the tool or hits Return, I would like to show a message with the results of these calculations.

tool = RG::Aoi::PickSurface.new
Sketchup.active_model.select_tool(tool)
UI.messagebox(tool.results)

The tool is defined as follows

module RG::Aoi
  class PickSurface
    attr_reader :results

    def activate
    .....
    end
    
   other events
 end
end

The problem that I have is that UI.messagebox is executed immediately after the tool activation and the tool cannot be used until I click OK. This means that tool.results is of course nil. The tool is activated within a callback from webdialog if that counts.

I guess I could save the results of the calculation in a file and read the file later, but this would require the user to perform another action.

Is there a better solution? Can tools be used in this way?

Posts: 6

Participants: 3

Read full topic

Cutting a Solid in the API

$
0
0

@medeek wrote:

When I attempt to cut a solid within the API I am always left with this sort of situation, I’m sure others have encountered a similar problem.

I am curious why it leaves the residual face and lines?

Does anyone have a good workaround for this?

Posts: 1

Participants: 1

Read full topic

Texture inconsistent on the same component in different locations

$
0
0

@JMZ wrote:

Happy Friday,

I have a question regarding textures on components using Ruby script. Please see the image below:

All three of these components are created using the same code, but the only difference is their positioning. The texture on the back-right component is how it is supposed to look, and the geometry for that component is based off the point [0,0,0]. But once the component is moved the texture gets distorted.

The texture that I’m using is an .skm file that I created from a jpeg.

Is there a known way to fix this issue?

Posts: 3

Participants: 3

Read full topic

Traversing through Entities in a Group

$
0
0

@medeek wrote:

I’m currently working on the window and door editing tool of the new Wall Plugin and I’m trying to collect the list of entities (groups) within my wall group that are doors and windows. Each group will have a regular naming convention (ie. door1, door2, door3 etc… or window1, window2, window3 etc…)

I am ashamed to say that my Ruby knowledge or experience with the grep method or function is not very strong. I am thinking this would be the best method for grabbing these groups from the list of entities within the wall group.

Any guidance or direction would be helpful. I think I can probably figure out the correct code but I just don’t want to go down a specific route when there might be a significantly better or more efficient way of doing this.

Posts: 5

Participants: 3

Read full topic

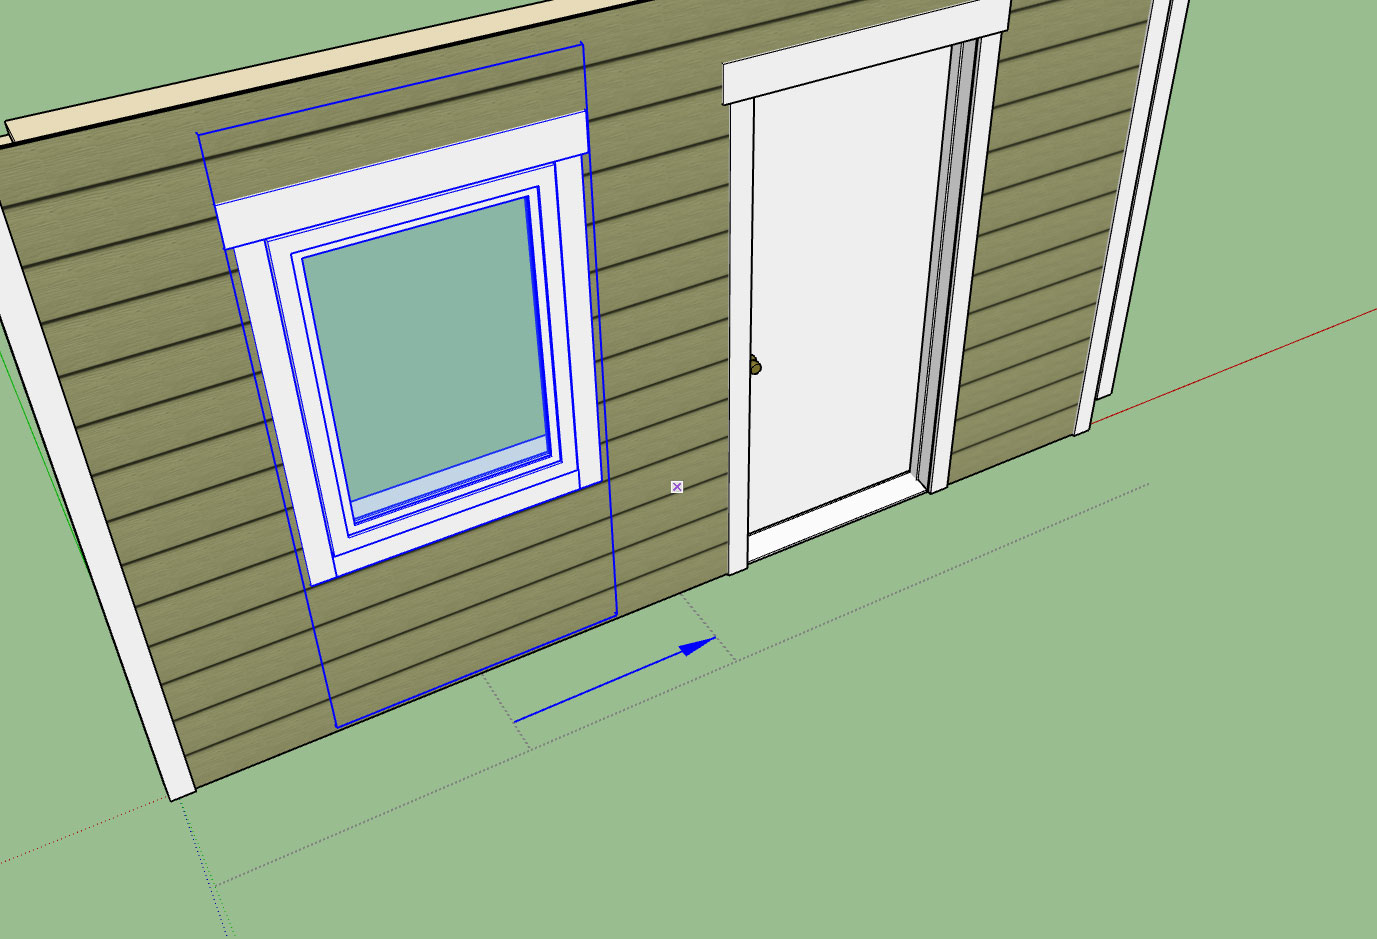
Highlighting a Bounding Box (of a Group)

$
0
0

@medeek wrote:

So I now have a collection of window and door groups nested within my main wall group (wall assembly).

As the user mouses over the various windows or doors I will have the tool determine if the point is within the bounding box of the window or door group and then base its selection on that criteria.

However I thought it might be nice to have the tool highlight all of the window and door groups within a selected wall group. However, I don’t want to add all of these groups to the selection set but rather just draw a thick green line around each bounding box of each window or door group of the currently selected wall so that the user gets a clear indication of where they need to click to select a particular opening.

The code to create the highlighted lines will reside in my draw method of the tool. I am wondering if there is already a nice method or algorithm someone has devised that will grab the eight points of the bounding box and draw the lines.

Posts: 5

Participants: 2

Read full topic

Drawing a Face on the View with a Ruby Tool

$
0
0

@DanRathbun wrote:

Continuing the discussion from Highlighting a Bounding Box (of a Group):

YES. (But they are not really geometric faces.)

Try using one of the polygon-like GL constants of View#draw (the last 6 in the list.)

The Sketchup::Tool#draw() documentation actually shows an example
of drawing a pink filled quad with a crimson border.

Here is another example … paste into the console and type TestTool.go
then click with LMB (repeatedly) in the modeling area to see a “walking” polygon.

class TestTool

  def self.go
    Sketchup.active_model.select_tool(self.new)
  end

  def activate
    @start = 0
    @side = 10
    set_points()
  end

  def deactivate(view)
    view.drawing_color= Sketchup::Color.new("Black")
  end

  def draw(view)
    view.drawing_color= Sketchup::Color.new("Orange")
    view.draw(GL_POLYGON, @points)
    @start += @side
  end

  def getExtents()
    Sketchup.active_model.bounds.add(@points)
  end
  
  def onLButtonUp(flags, x, y, view)
    set_points()
    view.refresh # calls getExtents() then draw() method
  end

  def set_points()
    @points = [
      Geom::Point3d.new(@start, 0, 0),
      Geom::Point3d.new(@start+@side, 0, 0),
      Geom::Point3d.new(@start+@side, @side, 0),
      Geom::Point3d.new(@start, @side, 0)
    ]
  end
  
end

BTW, the quad walks out of bounds for me and disappears. You can only draw within the model bounds.
Somewhere there is a method that will recalculate the bounds after you add geometry. (Can’t find it right now.)
EDIT: Steve found it (below,) edited example.

Posts: 4

Participants: 3

Read full topic

Efficient Code?

$
0
0

@medeek wrote:

As I’m working on the finishing touches to the Wall Plugin the six panel door geometry is something that keeps coming back to me.

This type of door geometry is fairly typical so eventually I would like to implement it however it does have a very high polygon count comparatively speaking. I’ve devised a fairly straightforward piece of code that generates a single panel, see below (cut and paste into the ruby console to view solid geometry):

group1 = Sketchup.active_model.entities.add_group
entities = group1.entities


new_face1 = entities.add_face [0,0,0], [500,0,0], [500,500,0], [0,500,0]
new_face1.pushpull 50

pt1 = [100,100,0]
pt2 = [200,100,0]
pt3 = [200,200,0]
pt4 = [100,200,0]

new_face2 = entities.add_face pt1, pt2, pt3, pt4

pt1 = [130,130,0]
pt2 = [170,130,0]
pt3 = [170,170,0]
pt4 = [130,170,0]

new_face2 = entities.add_face pt1, pt2, pt3, pt4

pt1 = [110,110,0]
pt2 = [190,110,0]
pt3 = [190,190,0]
pt4 = [110,190,0]

new_face2 = entities.add_face pt1, pt2, pt3, pt4

line1 = entities.add_line pt1, pt2
line2 = entities.add_line pt2, pt3
line3 = entities.add_line pt3, pt4
line4 = entities.add_line pt4, pt1

entities_to_transform = [line1, line2, line3, line4]

transform = Geom::Transformation.new([0,0,-5])
entities.transform_entities(transform, entities_to_transform)

However, my concern is that this block of code will need to be iterated twelve times in order to create the six panels on each side of the door, a lot of computation in order to create this door style. In that light, I would like for this code to be efficient and tight as possible, since the plugin is already quite heavy just in generating simple block geometry (ie. studs, casing, trim etc…).

Is there a more efficient way to write this block of code?

Posts: 2

Participants: 2

Read full topic


How to change current layer by ruby API

$
0
0

@Ahmed1 wrote:

hello …
i have make a plugin to make dealing with a lot of layers easier … and controlling of layer visibility works well but i didn’t found any API for change current layer , so i wondering how i can make that screenshot?

Posts: 3

Participants: 3

Read full topic

Windows and PDF exports

$
0
0

@Mickael wrote:

Hello !

I would like to export my 3D scene into a 2D vector, most likely in .pdf format, using the Ruby API and the model.export function, but I don’t understand the windows-specific parameters described [here]. What does they refer to ? Is there a way to set a width / height value or a scale for my picture ? (in order to import it at the correct size into another software).

Thanks in adavance !

Posts: 1

Participants: 1

Read full topic

Can Sketchup execute a proc's

$
0
0

@jim1300 wrote:

Default code, use or delete…

mod = Sketchup.active_model # Open model
ent = mod.entities # All entities in model
sel = mod.selection # Current selection

ang_a = proc.new {|d,f| d * f }

ang_a.call(3 ,4)

puts “ang_a”

Posts: 3

Participants: 3

Read full topic

Drawing Arrows within a Tool

Snapping to Temp Lines

$
0
0

@medeek wrote:

I would like to create a grid along the length of my wall (temporary) with the GL and draw method within my move opening tool.

However, after creating some temporary lines I just realized that the cursor will not snap to these lines or inference from them.

Has anyone else confronted this same situation and what is the the best solution?

I’m still pretty green when it comes to the SketchUp Tool class so I am probably missing something here.

What would be the best way to create some grid lines that the user could snap to?

Posts: 4

Participants: 3

Read full topic

Tools and Inference

$
0
0

@medeek wrote:

Can anyone explain what exactly the code of these two methods are doing, I can’t find anything on this constant called “CONSTRAIN_MODIFIER_KEY”:

def onKeyDown(key, rpt, flags, view)
    if( key == CONSTRAIN_MODIFIER_KEY && rpt == 1 )
        @shift_down_time = Time.now
        
        # if we already have an inference lock, then unlock it
        if( view.inference_locked? )
            view.lock_inference
        elsif( @state == 0 )
            view.lock_inference @ip
        elsif( @state == 1 )
            view.lock_inference @ip, @ip1
        end
    end
end

def onKeyUp(key, rpt, flags, view)
    if( key == CONSTRAIN_MODIFIER_KEY &&
        view.inference_locked? &&
        (Time.now - @shift_down_time) > 0.5 )
        view.lock_inference
    end
end

Posts: 2

Participants: 2

Read full topic

Bug with the Window and Door Move Tool

$
0
0

@medeek wrote:

Take a look at this video and you will understand what I am getting at. I would like the draw method to smoothly move with the cursor.

Posts: 1

Participants: 1

Read full topic


Parametric.rb

$
0
0

@tiziano.traini wrote:

Goodmorning everyone.

I use the script parametric.rb in some of my scripts and I find it difficult to save the data for the selected face on which I perform the operations provided by my script so that it can be accessed again during edit mode.
I thank the help in advance.

Greetings

Tiziano Traini

Copyright 2013, Trimble Navigation Limited

Copyright 2018, By SOFTDEG di Traini Tiziano Certaldo (FI) ITALIA

se usato in ambito professionale è gradita una donazione

PayPal : tiziano.traini@tin.it

This software is provided as an example of using the Ruby interface

to SketchUp.

Permission to use, copy, modify, and distribute this software for

any purpose and without fee is hereby granted, provided that the above

copyright notice appear in all copies.

THIS SOFTWARE IS PROVIDED “AS IS” AND WITHOUT ANY EXPRESS OR

IMPLIED WARRANTIES, INCLUDING, WITHOUT LIMITATION, THE IMPLIED

WARRANTIES OF MERCHANTABILITY AND FITNESS FOR A PARTICULAR PURPOSE.

#-----------------------------------------------------------------------------

Name : SOFTDEG_Vetrate 1.1.0

Description : Un plugin per creare infissi civili parametrici.

Menu Item : Tools->SOFTDEG_Vetrate

Context Menu: Edit SOFTDEG_Vetrate

Usage : Rileva superficie e immetti le caratteristiche di una vetrata.

: Per le modifiche successive tasto destro sulla vetrata e

: selezionare Edita SOFTDEG_Vetrata

:

Date : 05/05/2018

Type : Dialog Box

#-----------------------------------------------------------------------------

Classes per creare ed editare vetrate parametriche

require ‘sketchup.rb’
require ‘SOFTDEG_vetrate/parametric.rb’

module SOFTDEG_Vetrate

class Vetrate < SOFTDEG_Vetrate::Parametric

#original offset by Rick Wilson
#Smustard
def offset_(face=nil, dist=0)
return nil if not face or not face.valid?
return nil if (not ((dist.class==Fixnum || dist.class==Float || dist.class==Length) && dist!=0))
pi=Math::PI
verts=face.outer_loop.vertices
pts=[]

0.upto(verts.length-1) do |i|
	vec1=(verts[i].position-verts[i-(verts.length-1)].position).normalize
	vec2=(verts[i].position-verts[i-1].position).normalize
	vec3=(vec1+vec2).normalize
	if vec3.valid?
		ang=vec1.angle_between(vec2)/2
		ang=pi/2 if vec1.parallel?(vec2)
		vec3.length=dist/Math::sin(ang)
		t=Geom::Transformation.new(vec3)
		if pts.length > 0
			if not (vec2.parallel?(pts.last.vector_to(verts[i].position.transform(t))))
				t=Geom::Transformation.new(vec3.reverse)
			end#if
		end#if
		pts.push(verts[i].position.transform(t))
	end#if
end#upto
face.parent.entities.add_face(pts) if pts[2]

end#offset_

Crea vetro doppio, singolo con spessore (thick_v) 0 oppure senza vetro con spessore (thick_v) negativo

def vetro(newFace, width, thick, d_a, thick_v, container)

frame = container.add_group
group_container = frame.entities

if thick_v == 0.mm
	thick_v=1.mm
	thick_vv=0.mm
end
	
da=d_a+(thick-thick_v)/2

intFace=offset_(newFace,-width)
	
telaio_i = intFace.outer_loop.vertices
telaio_i = group_container.add_face(telaio_i)	

if not telaio_i.normal.z == 1
	telaio_i.reverse!	
end

status = telaio_i.material = "vetro_01"
status = telaio_i.back_material = "vetro_01"
vetro1=telaio_i.pushpull((da+thick_v),true)	
	
telaio_i.pushpull(da+(thick_v/2))

@entities.erase_entities(telaio_i.outer_loop.edges,intFace.outer_loop.edges)

intFace = offset_(newFace,-width)
	
telaio_i = intFace.outer_loop.vertices
telaio_i = group_container.add_face(telaio_i)	

if not telaio_i.normal.z == 1
	telaio_i.reverse!	
end

status = telaio_i.material = "vetro_01"
status = telaio_i.back_material = "vetro_01"

if not thick_vv == 0.mm 
	vetro2 = telaio_i.pushpull(da,true)
	telaio_i.pushpull(da+(thick_v/2))
	@entities.erase_entities(telaio_i.outer_loop.edges,intFace.outer_loop.edges)
else
	@entities.erase_entities(telaio_i, telaio_i.outer_loop.edges,intFace.outer_loop.edges)
end

newFace.erase!

frame

end #def

Crea telaio/anta/cornice mediante dimensioni e sfalsamento in asse e offset dalla faccia di partenza (foro muratura)

def anta(newFace1, d_o, d_a, width_a, thick_a, container)

frame = container.add_group
group_container = frame.entities

newFacet = newFace1.outer_loop.vertices
newFacet = container.add_face(newFacet)

if  d_o == 0.mm
	newFace = newFace1
else
	newFace = offset_(newFacet,d_o)
	newFacet.erase!
end
	
intFace = offset_(newFace,-width_a)
	
telaio_e = newFace.outer_loop.vertices
telaio_e = group_container.add_face(telaio_e)	

telaio_i = intFace.outer_loop.vertices
telaio_i = group_container.add_face(telaio_i)
telaio_i.erase!

status = telaio_e.material = "legno_01"
	
if not telaio_e.normal.z == 1
	telaio_e.reverse!
end
	
anta1=telaio_e.pushpull((d_a+thick_a),true)

if not telaio_e.normal.z == 1
	telaio_e.reverse!
end 
	
telaio_e.pushpull -d_a
	
if not d_o == 0
	@entities.erase_entities(newFace.outer_loop.edges, intFace.outer_loop.edges)
else
	@entities.erase_entities(intFace.outer_loop.edges)
	newFacet.erase!
end

frame

end #def

def create_entities(data, container)

# imposta costanti
anta_a=20.mm 	# Sfalsamento anta dal telaio
thick_c=70.mm 	# Spessore Cornice
thick_a=70.mm 	# Spessore Infisso Anta
lista_t=10.mm	# Spessore lista interna
lista_d_a=20.mm	# Sfalsamento lista dall'anta


# Set values from input data
a99 = data["a99"] # faccia di partenza
a0 = data["a0"].to_l # Cornice esterna Larghezza
a1 = data["a1"].to_l # Telaio infisso Larghezza
a11= data["a11"].to_l # Lista rifinitura interna Larghezza
a2 = data["a2"].to_l # Spessore Vetro
a3 = data["a3"].to_l # Stecche oriz. Larghezza
a4 = data["a4"].to_l # Stecche vert. Larghezza
a5 = data["a5"].to_int # N Stecche orizzontali
a6 = data["a6"].to_int # N Stecche verticali

if a2 > (thick_c-20.mm)
	a2=(thick_c-20.mm).to_l
	data["a2"]=a2
end


# Remember values for next use
@@face = a99
@@width_c = a0
@@width_a = a1
@@lista_w = a11
@@thik_v = a2
@@width_so = a3
@@width_sv = a4
@@ns_o = a5
@@ns_v = a6


# Inizio creazione vetrata

model = Sketchup.active_model
@entities = model.active_entities
sel = model.selection

# Definisce i due materiali utilizzati
mats=model.materials
if mats["legno_01"]==nil
	legno=mats.add("legno_01")
	legno.color="Brown"
end#if
if mats["vetro_01"]==nil
	vetro=mats.add("vetro_01")
	vetro.color="Gray"
	vetro.alpha=0.25
end#if


if Sketchup.version_number < 7000000
    model.start_operation "Vetrate"
else
    model.start_operation "Vetrate", true
end
  
faces = sel.select{|e| e.typename == 'Face'}
  
#if not faces.length > 0
  
#end
   
model.start_operation("Crea Telaio")

faces.each do |face|


	#crea gruppo della faccia originale
	tgroup=@entities.add_group
	tentities=tgroup.entities
	iface=face.outer_loop.vertices
	oface=tentities.add_face(iface)
	
	#crea telaio esterno
	newFace0=oface
	cornice_o=a0
	cornice_a=0.mm
	cornice=anta(newFace0,cornice_o,cornice_a, 2*a0, thick_c, container)
	
	#crea lista di finitura interna
	if a11 > 0
		newFace1=oface
		# ottimizza sfalsamento cornice finitura interna
		if a0 < lista_d_a
			lista_d_a=a0/2
		end
		
		lista_o=lista_d_a+a11
		lista=anta(newFace1, lista_o, thick_c, a11, lista_t, container)
				
	end

	#crea anta interna
	if a1 > 0
		newFace2=oface
		anta_o = 0.mm
		anta=anta(newFace2,anta_o, anta_a, a1, thick_a, container)
	else
		a1=a0
		anta_a=0
	end
		
	#crea vetro
	newFace3=oface
	if a2 >= 0.mm								
		vetro=vetro(newFace3, a1, thick_a, anta_a, a2, container)
	end
	
	face.erase!

	tgroup.erase!
			
end
model.commit_operation

end #end def

def default_parameters
# Set starting defaults
if !defined? @@width_c # then no previous values input
defaults = {“a0” => 40.mm, “a1” => 80.mm, “a11” => 70.mm, “a2” => 30.mm, “a3” => 40.mm, “a4” => 40.mm, “a5” => 0, “a6” => 0 , “a99” => nil }
else
# Reuse last inputs as defaults
defaults = {“a0” => @@width_c, “a1” => @@width_a, “a11” => @@lista_w, “a2” => @@thik_v, “a3” => @@width_so, “a4” => @@width_sv, “a5” => @@ns_o, “a6” => @@ns_v, “a99” => @@face }
end # if
end # default_parameters

def translate_key(key)
prompt = key
case( key )

    when "a0"	
		prompt = " Cornice esterna Larghezza "
	when "a1"
		prompt = " Telaio infisso Larghezza "
	when "a11"
		prompt = " Lista rifinitura interna Larghezza "
	when "a2"
        prompt = " Spessore Vetro "
	when "a3"
		prompt = " Stecche oriz. Larghezza "
	when "a4"
		prompt = " Stecche vert. Larghezza "
	when "a5"
		prompt = " N Stecche orizzontali "
	when "a6"
		prompt = " N Stecche verticali "	
	
end
prompt

end

end # Class Vetrate

#=============================================================================

if (not $Vetrate_menu_loaded)

### commands
cmd1=UI::Command.new("SOFTDEG_Vetrate") { Vetrate.new } 
cmd1.tooltip='Vetrate Irregolari Parametriche - donazione PayPal: tiziano.traini@tin.it'
cmd1.status_bar_text='Vetrate Irregolari: Seleziona una faccia ...'
cmd1.small_icon=File.join('SOFTDEG_vetrate', 'SOFTDEG_Vetrate_16x16.png')
cmd1.large_icon=File.join('SOFTDEG_vetrate', 'SOFTDEG_Vetrate_24x24.png')
###

menu=UI.menu("Tools").add_item(cmd1) 
toolbar=UI::Toolbar.new('SOFTDEG_Vetrate')
toolbar.add_item(cmd1)
toolbar.restore if toolbar.get_last_state.abs==1 #TB_VISIBLE/NEVER

$Vetrate_menu_loaded = true

end

end # module SOFTDEG_Vetrate

Posts: 1

Participants: 1

Read full topic

Create transparent operations with the observer

$
0
0

@dynamiqueagencement wrote:

Hello everyone,

After submitting my new plugins to the extension bank, he asks me to fix some things.

Here is their message:

Here are the notes from the reviewer:
Observers should create transparent operations.
entity.model.start_operation('add texture', true)

Here is the code in question:

class MyEntitiesObserver < Sketchup::EntitiesObserver

  def onElementAdded(entities, entity)

    return unless entity.is_a?(Sketchup::ComponentInstance)
    
    mod = Sketchup.active_model
    mats = mod.materials
    entity.model.start_operation('add texture', true) 
    matatt = [] 
    add_mat(entity, matatt)
    matatt.compact!
    matatt.uniq!
    matskt = []
    mod.materials.each{ |m| matskt << m.name }
    matadd = matatt - matskt  
    plans_jpg = ['PLAN']

    path_plans = File.join(Sketchup.find_support_file('plugins'), "TNT_ClickChange2/Materials/PLAN/")
      
    last02 = mod.get_attribute("Plan","Last","27")
      
    all = []
    all << plans_jpg
      
    matadd.each do |m|
      unless all.include?(m)
        
        matnew = mats.add(m)
          
        if plans_jpg.include?(m)
          matnew.texture = path_plans + "#{last02}-#{m}.jpg"
        else
          matnew = "RED"
        end
      end
    end
    entity.model.commit_operation
    onElementAdded2(entities, entity)
    entities.remove_observer(self)
  end      

  def add_mat(entity, matatt)
    entity.definition.entities.grep(Sketchup::ComponentInstance).each do |e|  
      attribut = e.get_attribute 'dynamic_attributes', 'material'
      unless attribut.nil?
        unless attribut == "#{ ""}"
          matatt << attribut
        end 
      end
      add_mat(e, matatt)
    end
  end 

TNT_COMPONENT_PATTERNS = [/TABLE SUR PIED CLC2/,/PLAN BAR/,/PLAN DE TRAVAIL DYNAMIQUE/]  
  
  def onElementAdded2(entities, entity)
    return unless entity.is_a?(Sketchup::ComponentInstance)
    return unless TNT_COMPONENT_PATTERNS.any?{ |pattern| entity.definition.name =~ pattern }
    
    $dc_observers.get_latest_class.redraw_with_undo(entity)
     
    entity.model.start_operation('Color Faces', true)
    meubels_verven(entity)
    entity.model.commit_operation
	  entities.remove_observer(self)
  end
	
  PAINT_COMPONENT_PATTERNS = [/PLATEAU BAR/,/PLAN/]
  DONT_PAINT_COMPONENT_PATTERNS = [/POIGNEE/]
    
  def meubels_verven(entity, paint_subcomponent = false)
    entity.definition.entities.grep(Sketchup::ComponentInstance).each do |instance|
      
    next unless (paint_subcomponent) || PAINT_COMPONENT_PATTERNS.any?{ |pattern| instance.definition.name =~ pattern }
    next if DONT_PAINT_COMPONENT_PATTERNS.any?{ |pattern| instance.definition.name =~ pattern }
    
      if instance.material
        instance.definition.entities.grep(Sketchup::Face).each do |f|
          f.material = instance.material
          instances_parent = instance.parent.name
          stop = []
          ["V40","V60","V80","V100"].each do |lst|
            stop << "STOP" if instances_parent.include?(lst)
          end
          if stop.empty?
            f.back_material = instance.material 
          end
        end
      end
      meubels_verven(instance, true)
    end
  end   
end

This code is active when components with the definition “PLATEAU BAR” or “PLAN” are imported into SketchUp.

The goal is to create the material “PLAN” and apply it to the premitives of the components.

The code works well and I’m not sure I understand their expectations.

Can you help me understand that he is not going?

Thank you

Posts: 1

Participants: 1

Read full topic

WebDialog return params to calling method

$
0
0

@fleawig wrote:

Hi everyone, I’ve got an HtmlDialog feature for which I’d like to offer a WebDialog fallback, but I’m having a little trouble with what seems to be different behavior between the two.

The dialog is created with a line that expects parameters returned, like this:

params = message_box(title, key, JSON.generate(hash))

My message_box() method sets up the dialog properties, accounts for differences between HtmlDialog and WebDialog, and adds a couple of callbacks. (I’m leaving out those differences in what I’ve pasted here, for now, in favor of the original method, which is clearer for now.) With HtmlDialog, it returns a params variable to the calling method when the dialog is closed. In other words, it doesn’t execute the last parts of the method until after the dialog has closed. But, with WebDialog, this fires out of sequence: the message_box() method goes right on down to the bottom, returns something to the calling method, and only executes the callbacks afterwards.

Somehow, I’m trying to get this method to return a params value with WebDialog as well, but no matter what I try, the method always returns something too soon, before we are ready with params from the callback… Trying an explicit return params from the callback gives me a LocalJumpError, for example. Anyone have any ideas?

Many thanks in advance!

(I should note also that the method def below doesn’t reflect other changes I’ve made to accommodate WebDialog, such as that set_can_close is not called, etc.)

def self.message_box(title, key, json)
    loaded_json = JSON.load(json)
    width = Global::get_messagebox_width
    height = Global::get_messagebox_height
    html_path = File.join(File.expand_path(File.dirname(__FILE__)), '/html/messagebox.html')
    @messagebox = UI::HtmlDialog.new({
            :dialog_title => title,
            :preferences_key => key,
            :scrollable => false,
            :resizable => false,
            :width => width,
            :height => height,
            :center => true,
            :min_width => width,
            :min_height => height,
            :max_width => width,
            :max_height => height,
            :style => UI::HtmlDialog::STYLE_DIALOG
        })
    @messagebox.set_file(html_path)
    params = nil
    @messagebox.set_size(width, height)

    @messagebox.add_action_callback("dialogReady") { |wd, param|
        @messagebox.execute_script('skpCallbackReceived()')
        js_command = 'setup('+ json.to_s + ')'
        @messagebox.execute_script(js_command)
        params = param.split(' ')
        adjust_dialog_size(@messagebox, params[0].to_i, params[1].to_i, params[2].to_i)
    }
    
    @messagebox.add_action_callback("buttonResponse") { |wd, param|
        @messagebox.execute_script('skpCallbackReceived()')
        params = param.split(' ')
        @messagebox.set_can_close { true }
        @messagebox.close
    }

    @messagebox.set_can_close { true }
    @messagebox.center
    @messagebox.show_modal
    # we end up here on when the window closes..
    return params
end

Posts: 4

Participants: 2

Read full topic

3D Text and the API

$
0
0

@medeek wrote:

I’m thinking about using the add_3d_text method to add in window and door sizes into the 2D mode of the Wall Plugin.

The documentation seems fairly self explanatory however I don’t see a way to call out the text rotation.

Any thoughts or hints on using 3D text with the API within your model or a plugin?

Posts: 8

Participants: 3

Read full topic

Loading other Plugin Files

$
0
0

@medeek wrote:

I typically use this piece of code to load up other extension files:

    this_dir=File.dirname(__FILE__)
	# Fix for ruby 2.0
	if this_dir.respond_to?(:force_encoding)
		this_dir=this_dir.dup.force_encoding("UTF-8")
	end

	# Read Dictionary Attributes

	Sketchup.load(File.join(this_dir,"MEDEEK_RECT_WALL_DICTIONARY.rbs"))

I am wondering if I should be checking to see if the file is already loading prior to actually loading it?

If a file has been already loaded and you load it again what are the implications if any?

Posts: 2

Participants: 2

Read full topic

Viewing all 3017 articles
Browse latest View live


<script src="https://jsc.adskeeper.com/r/s/rssing.com.1596347.js" async> </script>